> ## Documentation Index
> Fetch the complete documentation index at: https://docs.hanko.io/llms.txt
> Use this file to discover all available pages before exploring further.
# Integrate Hanko with Nuxt
> Learn how to quickly add authentication and user profile in your Nuxt app using Hanko.
**Hanko Fullstack Integration Guide**:
**About Hanko**:
Hanko is a modern open source authentication solution and the fastest way you integrate passkeys, 2FA, SSO, and more—with full control over your data. Move between self-hosted and Hanko Cloud anytime. No lock-in. Just Auth how it should be: secure, user friendly, and fully yours.
**What This Guide Covers**: This comprehensive guide demonstrates integrating Hanko authentication into your fullstack application using the `@teamhanko/hanko-elements` package. You'll learn to set up authentication components, implement session management, secure routes with middleware, and handle user data across both client and server-side contexts.
**Key Technologies**:
* Modern fullstack framework with TypeScript,
* Server-side rendering capabilities
* Hanko Elements
* Hanko Cloud Console
* Session management
* Middleware protection
**Prerequisites**:
* Node.js installed on your system
* Basic knowledge of your chosen fullstack framework
* A Hanko Cloud account (sign up at [https://cloud.hanko.io/signup](https://cloud.hanko.io/signup))
**Integration Tasks You'll Complete**:
* Install and configure Hanko Elements package for your framework
* Set up HankoAuth component with session event handling and navigation
* Create HankoProfile component for user credential management
* Implement logout functionality with proper session cleanup and redirects
* Secure routes using framework-specific middleware with session validation
* Retrieve user data both client-side and server-side using appropriate APIs
* Handle authentication redirects, error states, and edge cases
* Configure server-side rendering integration and hydration
* Customize component appearance and behavior for your application
## Create a Nuxt application
First, create a new Nuxt.js application using the official Nuxt starter template. This command sets up a complete Nuxt project with TypeScript support and all necessary dependencies.
Run the following command to [create a new Nuxt application](https://nuxt.com/docs/getting-started/installation):
```bash npm theme={null}
npm create nuxt project-name
```
```bash pnpm theme={null}
pnpm create nuxt project-name
```
```bash bun theme={null}
bun create nuxt project-name
```
```bash yarn theme={null}
yarn create nuxt project-name
```
## Install `@nuxtjs/hanko`
Use the `@nuxtjs/hanko` module to integrate Hanko authentication. It provides pre-built components (`hanko-auth`, `hanko-events`, `hanko-profile`), server middleware for route protection, and Vue composables for easy authentication management.
Install the module as a development dependency:
```bash npm theme={null}
cd project-name
npm install -D @nuxtjs/hanko
```
```bash pnpm theme={null}
cd project-name
pnpm add -D @nuxtjs/hanko
```
```bash bun theme={null}
cd project-name
bun add -D @nuxtjs/hanko
```
```bash yarn theme={null}
cd project-name
yarn add --dev @nuxtjs/hanko
```
## Set up your Hanko project
Before integrating Hanko into your application, you need to create a Hanko project in the cloud console. This project will provide you with an API URL and manage your authentication settings.
Go to the [Hanko Console](https://cloud.hanko.io/) and [create a project for this application.](/setup-hanko-cloud)
During project creation, make sure to set the `APP URL` to your development URL (typically [http://localhost:3000/](http://localhost:3000/)). This ensures proper CORS configuration and redirect handling.
## Add the Hanko API URL
After creating your Hanko project, you'll receive a unique API URL. This URL is used to communicate with Hanko's authentication services. The `NUXT_PUBLIC_` prefix makes this environment variable accessible in both server and client-side code.
Retrieve the API URL from the [Hanko Console](https://cloud.hanko.io/) and add it to your environment file:
```sh .env theme={null}
NUXT_PUBLIC_HANKO_API_URL=https://f4****-4802-49ad-8e0b-3d3****ab32.hanko.io
```
If you are self-hosting you need to provide the URL of your running Hanko
backend.
## Configure Nuxt module
Next, register the Hanko module in your Nuxt configuration and set up authentication behavior. This configuration defines where users should be redirected after login/logout and sets up the module with your API URL.
Add the `@nuxtjs/hanko` module to your `nuxt.config.ts` file:
```jsx nuxt.config.ts theme={null}
export default defineNuxtConfig({
modules: ["@nuxtjs/hanko"],
hanko: {
apiURL: process.env.NUXT_PUBLIC_HANKO_API_URL,
cookieName: 'hanko',
redirects:{
login: '/',//Path to redirect to when unauthenticated / logged out
success: '/dashboard',//Path to redirect to once logged in
}
},
})
```
While the module comes pre-configured with the options for most common use cases, you have the flexibility to override them by adding a `hanko` section to your `nuxt.config.ts` file. For all overrides please refer to [module's repository](https://github.com/nuxt-modules/hanko).
**Using Hanko Components**
You can now use the components anywhere in your app (``, ``, ``). These will render only on client-side and all the props you can pass are strongly typed.
If you prefer not to auto-register these components, especially if you plan to use Hanko exclusively on the server side or wish to handle component registration programmatically, you can disable this feature. To do so, set the `registerComponents` option to false in your `nuxt.config.ts` file:
```jsx nuxt.config.ts theme={null}
hanko: {
registerComponents: false;
}
```
## Setup Nuxt pages
Nuxt uses file-based routing, where each file in the `pages/` directory becomes a route. To enable this routing system, add the `NuxtPage` component to your main application template.
Update your `app.vue` file to use the Nuxt Page Router:
```vue app.vue theme={null}
```
After that lets create a folder called `/pages` and in there we will create `index.vue` and `dashboard.vue`.
## Add `` component
The `` web component provides a complete login and registration interface with passwordless authentication. The `hanko-logged-out` middleware ensures that already authenticated users are automatically redirected to the dashboard.
Create your login page at `pages/index.vue`:
```jsx pages/index.vue theme={null}
```
## Alternative: Custom redirect handling
If you need more control over post-login behavior, you can use the `` component to listen for authentication events and implement custom logic.
Here's an alternative approach with custom redirect handling:
```jsx pages/index.vue theme={null}
```
## Define event callbacks
Hanko emits various [authentication events](https://github.com/teamhanko/hanko/blob/main/frontend/elements/README.md#events) that you can listen to for custom application logic. These events include session creation, updates, and destruction.
Add the `` component to subscribe to authentication events:
```jsx pages/index.vue theme={null}
```
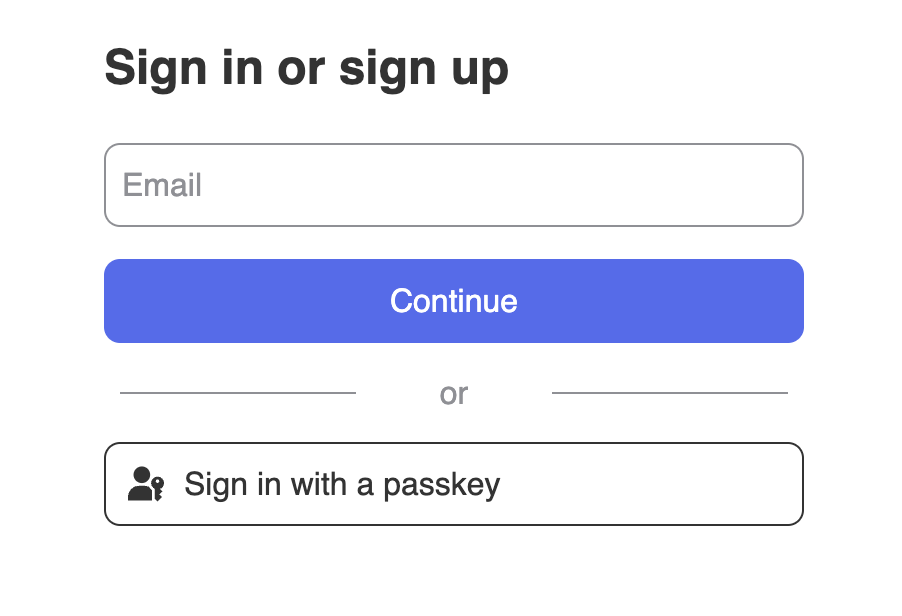
By now, your sign-up and sign-in features should be working. You should see an interface similar to this 👇
## Add ``
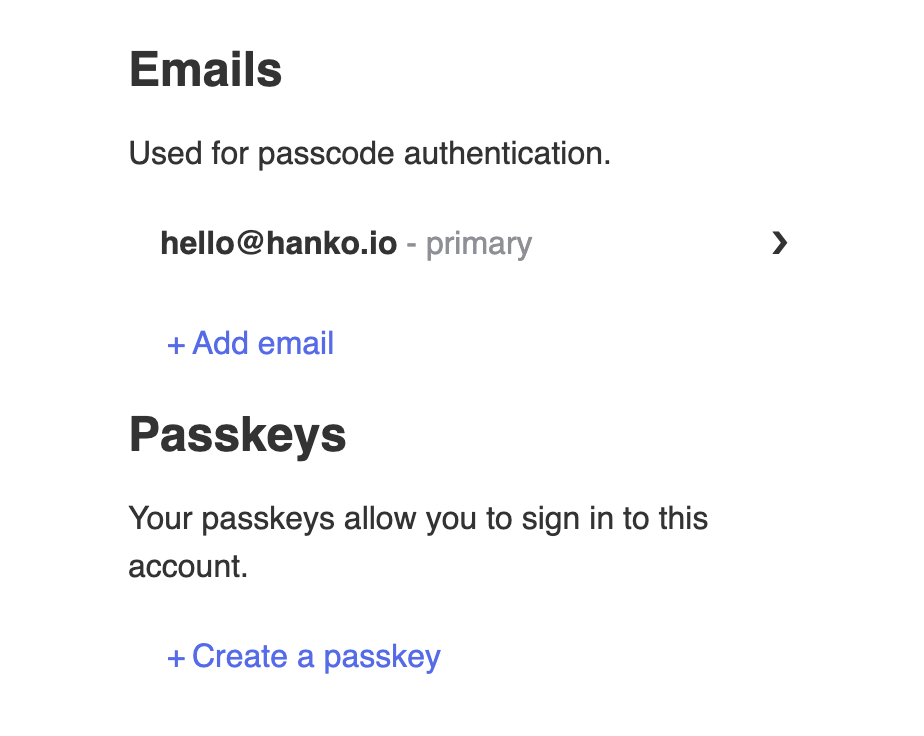
The `` component provides a user-friendly interface for managing authentication credentials. Users can add/remove email addresses, register new passkeys, and manage their authentication methods.
Create a dashboard page at `pages/dashboard.vue`:
```jsx pages/dashboard.vue theme={null}
```
It should look like this 👇
## Implement logout functionality
To log users out, use the `@nuxtjs/hanko` module's built-in composable `useHanko` and call the `logout` method.
Secure dashboard page that combines profile management with logout functionality, protected by hanko-logged-in middleware and using the useHanko composable for session management
```jsx pages/dashboard.vue theme={null}
```
**useHanko() composable**
The `useHanko` composable provides access to the [Hanko SDK](https://docs.hanko.io/jsdoc/hanko-frontend-sdk/index.html) which in turn allows access to the Hanko API, e.g. for accessing the [current user info](https://docs.hanko.io/jsdoc/hanko-frontend-sdk/UserClient.html#getCurrent).
The composable is auto-imported across the app and can simply be used with `useHanko()` anywhere in your code.
## Customize component styles
You can customize the appearance of `hanko-auth` and `hanko-profile` components using CSS variables and parts. Refer to our [customization guide](/guides/hanko-elements/customize-appearance).
The styles can be scoped to the login/profile page to ensure they dont affect other parts to the app.
## Securing routes with middleware
Use the `hanko-logged-in` middleware to secure any route and force unauthenticated users to redirect back to the `login` redirect we set in the `nuxt.config.ts`.
Page metadata configuration that applies the hanko-logged-in middleware to protect routes from unauthorized access
```jsx theme={null}
```
A global server middleware is added by `@nuxtjs/hanko`. After decoding and validating the session token for the request, a new `hanko` property is added to the event context.
You can check the value of `event.context.hanko` to see if the request was authenticated. The user's id is accessible though the `sub` claim/property.
Server-side API endpoint example that demonstrates how to access authenticated user information through the event context, with proper error handling for unauthorized requests
```jsx /server/api/endpoint.ts theme={null}
export default defineEventHandler(async (event) => {
const hanko = event.context.hanko;
if (!hanko || !hanko.sub) {
return {
status: 401,
body: {
message: "Unauthorized",
},
};
}
// Do something with the Hanko user
return {
hanko: event.context.hanko,
};
});
```
## Try it yourself
{" "}
}
>
Full source code available on our GitHub
 ## Add `
 ## Implement logout functionality
To log users out, use the `@nuxtjs/hanko` module's built-in composable `useHanko` and call the `logout` method.
## Implement logout functionality
To log users out, use the `@nuxtjs/hanko` module's built-in composable `useHanko` and call the `logout` method.